How It's Made: Platinum & Rose Cut Engagement Ring
I recently had the pleasure of working with a local DC customer on a replacement engagement ring for his wife. He wanted something that was more reflective of her current style, and felt untraditional but timeless. Since he had a pretty good sense of the design he wanted, we were able to dive right into stone selection, and then I got working on the actual piece!
The first step was picking a stone. I traveled to New York to meet with a diamond dealer who specializes in rose cut diamonds (in case you're not sure what a rose cut diamond is, it's a diamond that is cut differently from a brilliant cut, which is what typically comes to mind when you think of a traditional engagement ring. Rose cut stones feature flat bottoms with a rounded crown, and vary in color from light white and champagne to reds, yellows, browns and greys. Rose cut stones were very popular in the 1500s, and have seen a resurgence in popularity in recent years). We had narrowed the color down to something lighter (I threw in the dark grey stone just for fun), so I was able to select several options and bring them back to DC to look at in person before deciding on the exact stone.

Once we selected the stone, I got to work on creating the band and the setting. We had landed on a center rose cut stone, with a diamond halo around it, all in platinum. Since platinum is incredibly hard and I knew the head would be thick, I decided to carve the setting out of wax. Wax is a great tool to use for pieces that require intricate designs, or when the metal is too difficult to manipulate into the shape you want. The wax shape is sent to a caster and returned in the metal of your choosing.

I made the band out of platinum wire. Platinum melts at a much higher temperature than gold or silver, so special tools and equipment (protective goggles!) are needed.

Once I received the head back from the caster, it was time to attach it to the band. I had filed a small seat into the setting so that the band was able to sit into it, however I wanted it to be super secure before I went to solder, since if the band tipped or moved when I was heating it it had the potential to ruin the ring. I decided to use a laser welder to attach the head to the band. While not sturdy enough on its own, the laser welder was able to secure the two together enough that I knew it would not move when I went to solder.
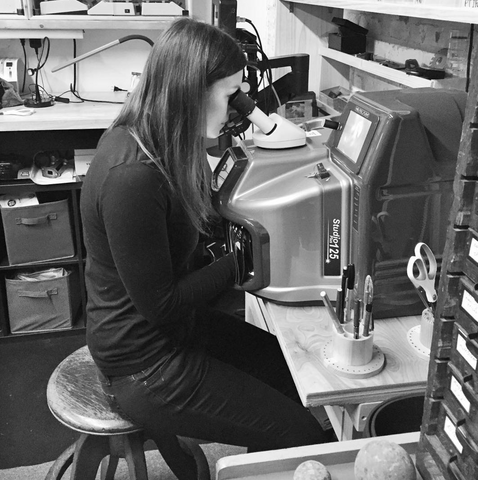
After the two pieces were attached, it was time for a LOT of cleaning. I had to make sure all marks were out of the piece and that the surface for setting stones was completely flat and free of any scratches. You can easily spend hours filing and polishing platinum!
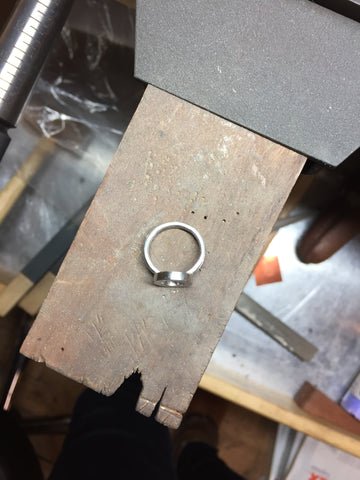

Now the most fun part...setting the stones! Typically I would set any side or accent stones before working on the main stone. However because of the size of the stone and the nature of the setting (plus, potential for slipping as I worked, which would be harder to clean up if accent stones were already in), I decided to set the center stone first. After the center stone was done, I measured out and spaced each of the small accent stones to form the halo.


2 comments
So enlightening! I had seen the ring on your Instagram and it’s fascinating to hear and see the back story. Keep these tales of “how something sprang into existence from just a thought” coming!
So enlightening! I had seen the ring on your Instagram and it’s fascinating to hear and see the back story. Keep these tales of “how something sprang into existence from just a thought” coming!